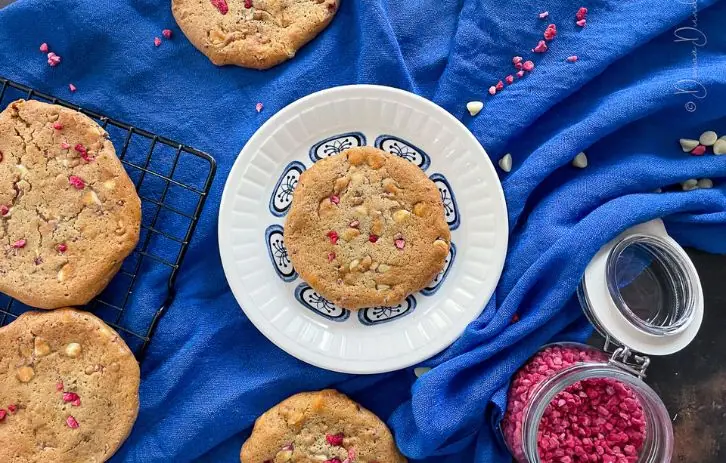
White Chocolate and Raspberry Cookies
Chewy white chocolate and raspberry cookies are simple, delightful, and consistently ideal. With a sweet yet tangy taste, they meet all the criteria!
*This article may includeaffiliate links to items I find beneficial when preparing this recipe. As an Amazon Associate, I earn from qualifying transactions.*
Baked cookies are among my favorite treats to prepare, and ideal for cooking with children.
After you’ve discovered a recipe that suits you and provides the texture you enjoy, it’s straightforward to begin incorporating various flavors and components.
These simple white chocolate and raspberry cookies are mouthwatering. They are chewy, sweet, and have a hint of tanginess, fulfilling all my cookie desires!
Why I Adore Raspberry and White Chocolate Cookies
I adore these cookies, and I hope you do too because:
- The flavors enhance each other exceptionally well.
- Light brown sugar results in a rich, sweet dough perfectly complemented by the raspberries.
- I utilize freeze-dried raspberries, which are super convenient to bake with.
- It’s an ideal, somewhat messy recipe for the kids to try!
Ingredients For White Chocolate and Raspberry Cookies
When I prepare this chewy white chocolate and raspberry cookies recipe, I use:
Margarine– Substitute butter if preferred, but the dough will be slightly stiffer.
Light Brown Soft Sugar– Employing brown sugar results in darker cookies, making it hard to see the raspberry pieces. If visibility is crucial, consider using half white granulated sugar alongside half brown.
Medium Egg
Golden Syrup
Vanilla Essence/Vanilla Extract
Plain Flour
Bicarbonate of Soda– or baking soda.
White Chocolate Chips
Freeze Dried Raspberries
You Will Also Require
I utilize a large mixing bowl, a hand whisk, and a wooden spoon, along with a saucepan to melt the butter.
To portion my cookies, I employ a standard ice cream scoop, and for baking, I use two large baking trays and reusable baking parchment.
How to Prepare Raspberry and White Chocolate Cookies – Step-by-Step Directions
Complete, easy-to-follow instructions and quantities are provided in the recipe card at the bottom of this entry.
Step One
Gently melt the margarine or butter on the stove or in the microwave, then set aside to cool.
for several minutes prior to utilizing (it doesn’t have to be chilled, but it shouldn’t be warm either)
Step Two
Blend the margarine and brown sugar in a spacious mixing bowl until you achieve a smooth consistency. This should only take a few seconds with melted margarine.
Step Three
Combine the egg, vanilla, and syrup in another smaller bowl.
Step Four
Incorporate this egg mixture into the butter and sugar, whisking it in.
Step Five
Stir in the flour and baking soda, mixing well.
Step Six
Add the white chocolate and raspberries, gently folding until evenly distributed.
Step Seven
Refrigerate for at least an hour.
Step Eight
Preheat the oven to 180 Degrees C (fan-assisted) and line two large baking trays with parchment paper.
Step Nine
Utilize an ice cream scoop to form six rough balls, placing them spaced out on a baking tray. Repeat for the other tray. This dough is quite messy, so there’s no need to aim for perfect rounds.
If you’ve used margarine, the dough will be stickier and softer, and the cookies will spread more. Conversely, if you’ve used butter, the dough will be firmer; hence, I recommend pressing the balls down into 5mm rounds before baking.
Step Ten
Bake for 10-12 minutes until they are golden brown.
Step Eleven
Allow them to sit on the tray for several minutes before gently transferring to a wire rack to cool completely.
If your cookies aren’t as flat as desired, gently press them out a little with the back of a clean metal spoon while they are still warm.
You may also press some additional raspberry pieces in now if you desire more color. This is what I’ve done for my photos, though I typically wouldn’t.
Step Twelve
If baking multiple batches, allow the tray and paper to cool completely before adding the next batch of dough. Keep the dough refrigerated in between batches.
White Chocolate and Raspberry Cookies Tips and Tricks
I believe cookies are quite personal. Some individuals prefer a floury, almost cake-like cookie, while others like them crispy, and some prefer them soft and chewy.
Therefore, I suggest considering your cookie preferences and finding a compatible recipe. It might not be mine.
I enjoy my cookies crisp around the edges but relatively soft and chewy in the center. I also prefer them to be quite large and flat.
My top recommendations for crafting white chocolate and raspberry cookies are:
- Melt or at least soften (by allowing to reach room temperature) your margarine. This ensures the butter and sugar blend in seconds, and you can integrate the flour with ease, minimizing the need to overmix.
- Opt for a cold baking tray; if baking in two rounds, let the tray cool before adding more cookie dough.
- Utilize baking paper.
- Keep the dough in the refrigerator for an hour prior to baking.
- Employ an ice cream scoop. The dough is fairly soft and sticky, so if shaping with your hands, rinse them in cold water after every few to prevent warming and overworking the dough.
- If your cookie dough is excessively sticky, gently mix in an additional tablespoon or two of flour or return it to the fridge for a longer period.
- If the cookies are too cakey for your liking, use a little less flour next time.
- I do not press this dough into rounds due to its softness, and they tend to spread. If they don’t spread as much as preferred, use the back of a metal spoon to flatten them while still warm. If butter was used instead of margarine, your dough will be stiffer, so I’d press down to 5mm rounds before baking.
- If you desire a crunchier cookie, extend the baking time by a few minutes.
- Allow cookies to set on the baking tray for a few minutes before carefully moving them to a wire rack to cool entirely.
Serving Suggestions
White chocolate and raspberry cookies are delightful on their own. However, gently warming them in the microwave or oven and adding a scoop of vanilla ice cream could enhance the experience!
For me, nothing surpasses a large, chewy bakery-style raspberry white chocolate cookie alongside an afternoon cup of tea!
Variations
You can modify the size, shape, and texture by adjusting the thickness of your balls and baking for a longer duration (refer to tips above). Besides that, the primary variations for this recipe revolve around the types of raspberries and white chocolate you incorporate.
I enjoy baking with freeze-dried raspberries. They are tidy and easy to handle, and since they are dry, they don’t introduce any moisture to the recipe, so you won’t need to make any other adjustments.
That said, you can certainly make white chocolate and raspberry cookies using fresh and frozen raspberries (I wouldn’t thaw them beforehand). I’d argue that chocolate raspberry cookies made with fresh raspberries likely look better with the large pink chunks.
They are, naturally, considerably heavier than freeze-dried ones. Hence, I recommend around 150g, and the added moisture may necessitate a few extra minutes of baking.
You’ll also need to fold them in more carefully to prevent them from being crushed.
Using white chocolate chunks instead of chips is another option, and one that I particularly favor. Chop 250g of white chocolate squares, leaving some quite large and breaking others into smaller pieces, and fold through as you would with chips.
I absolutely love raspberry and white chocolate chunk cookies and highly endorse this option.
Leftovers
Raspberry and white chocolate chip cookies can last for around 3-4 days.
Storage
Keep your cookies in an airtight container to maintain their freshness for as long as possible.
You can preserve raspberry and white chocolate biscuits. Put them into a sealed container (include a sheet of baking paper between them if you wish to extract them individually, without them adhering to one another) and freeze for as long as two months. Defrost in the refrigerator when required.
FAQ
As I utilize margarine in place of butter, you’d merely need to incorporate a vegan egg alternative and vegan white chocolate to transform these cookies into a vegan option.
Cookies are complete when the edges appear crisp and the centers remain slightly soft.
Indeed, I adore soft cookies.
To achieve crispy cookies, bake them for a few minutes longer.
Utilizing cold trays, baking paper, and chilling the dough will assist in preventing them from spreading. If they still spread excessively, attempt baking from thicker dough balls.
If your cookies have not spread and are thicker than desired, gently press down with the back of a spoon while they are still warm. Next time, flatten them a bit more prior to baking.
If you opt for butter instead of margarine, your dough might be firmer, so I suggest flattening to 5mm discs before baking.
I recommend keeping cookies in a sealed container overnight.
Other Recipes
If you appreciate this recipe for white chocolate and raspberry cookies, you might also want to explore:
Recipe Card
White Chocolate and Raspberry Cookies
Author Name
Soft white chocolate and raspberry biscuits are simple, delectable, and consistently ideal. With a sweet yet tart flavor, they fulfill all expectations!
- 150 g Margarine (Melted gently and allowed to cool slightly)
- 250 g Soft Light Brown Sugar
- 1 Medium Egg
- 2 Tablespoons Golden Syrup
- 2 Teaspoons Vanilla Extract
- 325 g Plain Flour
- 1.5 Teaspoons Bicarbonate of Soda
- 250 g White Chocolate Chips
- 20 g Freeze-Dried Raspberries
-
Beat the margarine and brown sugar in a grand mixing bowl until silky. This should take mere seconds with melted margarine.
-
In a separate smaller bowl, combine the egg, vanilla, and syrup.
-
Incorporate this egg mixture into the butter and sugar and mix well.
-
Add the flour and bicarbonate and whisk thoroughly.
-
Stir in the white chocolate and raspberries, folding until they are evenly distributed.
-
Refrigerate for at least one hour.
-
Preheat the oven to 180 Degrees C (convection) and line two large baking sheets with parchment paper.
-
Use an ice cream scoop to portion out six balls, placing them evenly spaced on a baking sheet. Repeat for the second sheet.
-
Bake for 10-12 minutes until a golden hue appears.
-
Allow them to rest on the tray for several minutes before carefully transferring to a wire rack to cool thoroughly.
-
If baking multiple batches, let the tray and paper cool completely prior to adding the next set of dough. Maintain the dough in the refrigerator between batches.
- If utilizing fresh or frozen raspberries, increase to 150g and gently fold into the dough.
- If the cookies do not spread as desired, gently press them down with the back of a clean metal spoon immediately after removing from the oven before they set.
- Using brown sugar will result in a darker dough, making it harder to see the small raspberry pieces. If this is crucial for you, opt for half white granulated and half either caster or brown sugar. You can also sprinkle extra raspberry pieces on top of the dough before or just after baking if you are cautious.
- Refer to the post above for additional tips and suggestions.
The nutritional information provided is merely a general guideline and may not be precise. This information is generated using an online calculator and is tailored to my ingredients. Consider recalculating for accuracy as needed.
Post Comment