Perfect Scrambled Eggs Recipe
I’ve prepared scrambled eggs countless times in my life, and I’m rather finicky about them. I prefer light and airy scrambled eggs adorned with cheese. They must not be soggy, undercooked, or overcooked (the worst—and that aroma!). I’m presenting my refined method with you today.
This recipe is intended for a stainless steel or cast iron frying pan. If you’ve ever been curious about how to prepare scrambled eggs without a nonstick frying pan, this article is for you. It is achievable!
Using this method and some practice, you’ll create exquisite scrambled eggs with minimal mess. Even if you believe you have your scrambled egg approach perfected, I think you may uncover some fresh tips here.
Scrambled Egg Advice
You’ll discover the complete recipe at the end of the post, plus a brief video below. I typically prefer to share reliable recipes, but this one requires some practice. Even then, some days my eggs turn out better than on others!
If you accidentally drop a piece of eggshell into your egg blend:
Utilize the edge of a broken eggshell to extract it against the bowl’s side, or dampen your fingers with water to aid in fishing them out.
Incorporate a small amount of milk.
Or for even creamier eggs, use half-and-half or heavy cream. Incorporating dairy makes the eggs taste a bit less egg-like (in a delightful way), results in a more attractive pale yellow hue, and, most importantly, provides a more enjoyable and tender texture.
Additionally, a pinch of salt.
Salt assists in softening the eggs. Add it as soon as possible and then allow the egg mixture to sit while you heat the pan for exceptionally tender eggs.
Whisk thoroughly.
I adore my small whisk for this task—it performs much better than a fork. Whisk until the eggs are consistently yellow to avoid stringy white bits in the final product.
Allow the eggs to rest for a few moments before cooking.
If you have time, permit the egg mixture to warm to room temperature before cooking, as it reduces sticking.
Heat the pan until it’s at just the correct temperature.
This is essential to keep your eggs from sticking to the skillet. Do not rush this step, and try to remain attentive to the stovetop. Check out my images and the video below for visuals.
Your skillet is ready when you can flick a few drops of water onto the pan and they dance or leap across the surface and then evaporate almost instantly.
Your pan isn’t sufficiently hot if the drops sputter and bubble. If the butter browns immediately, the pan is too hot—you’ll need to let it cool and start over.
Watch How to Create Scrambled Eggs
How to Flavor Scrambled Eggs
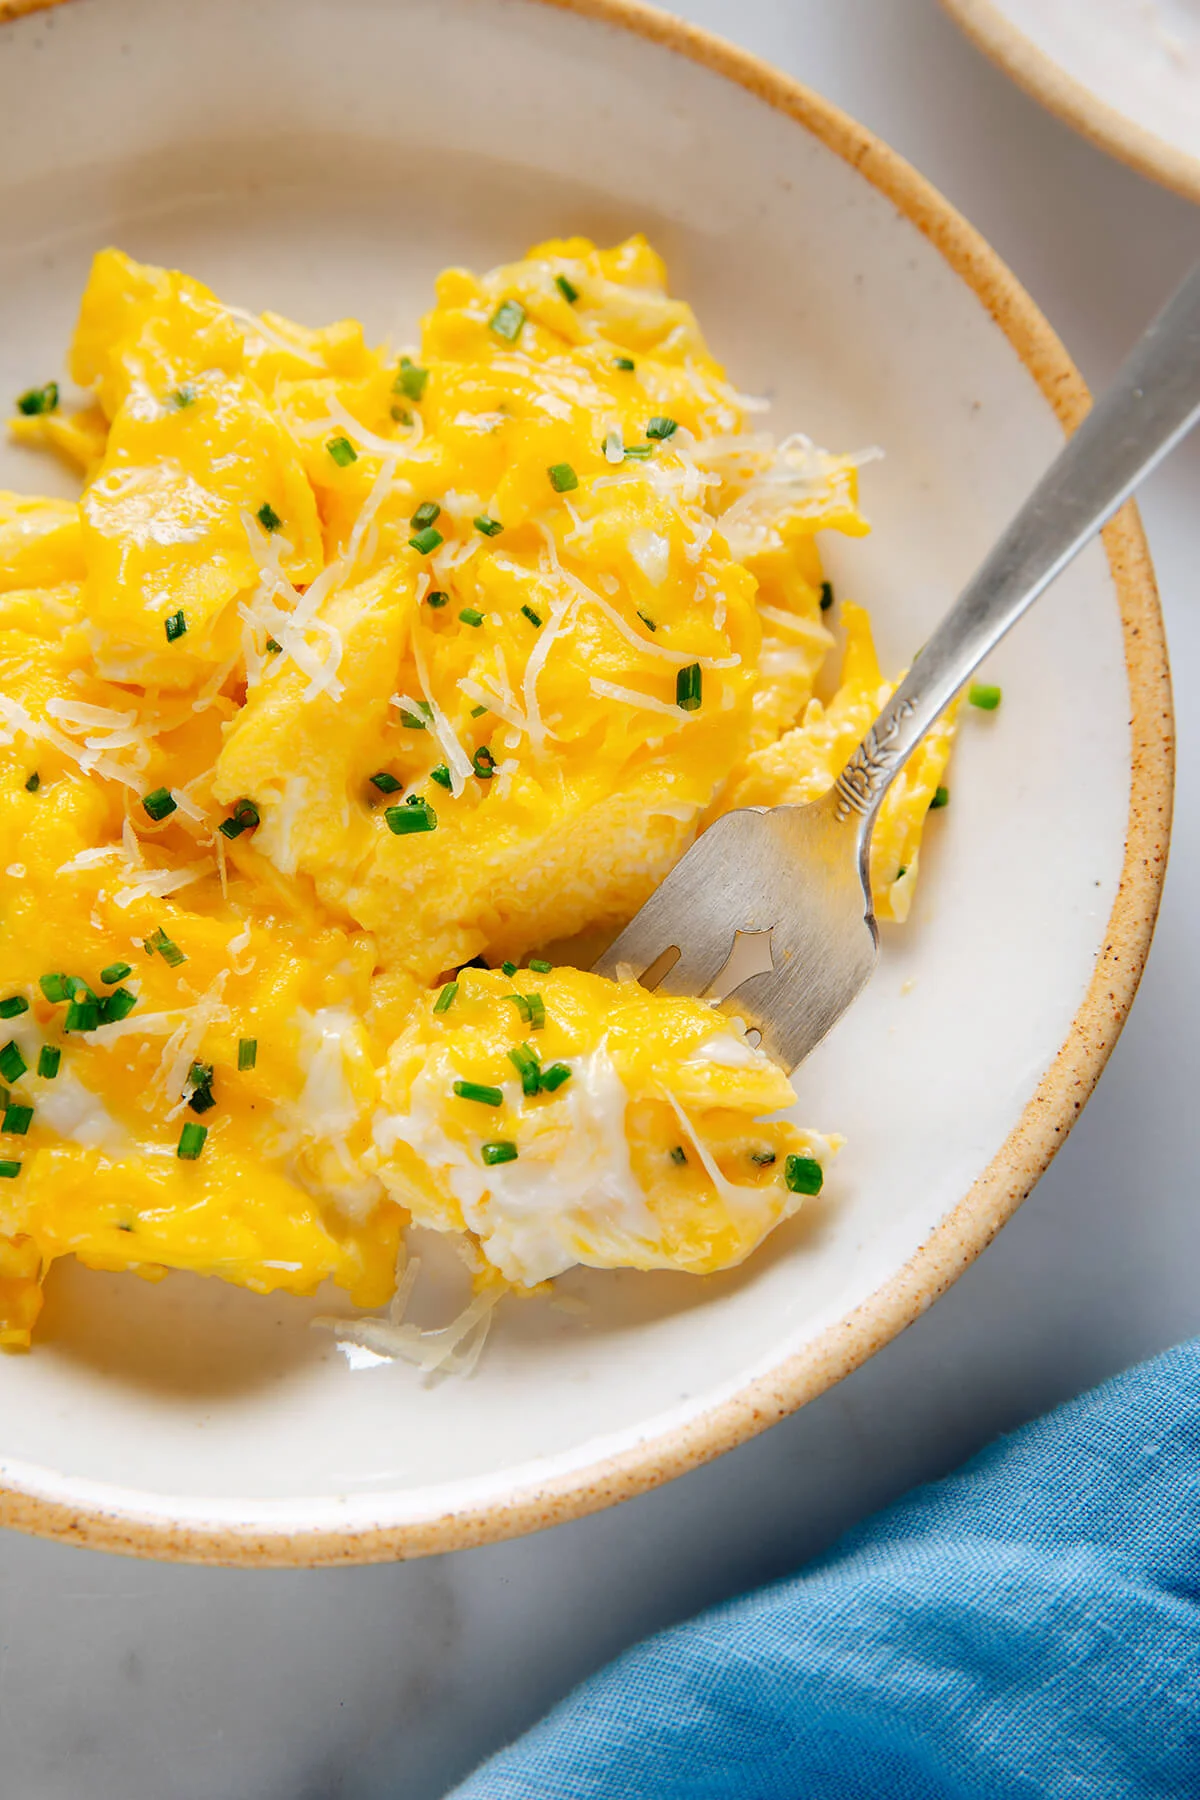
I enjoy incorporating chopped chives when they’re thriving in my garden. In fact, I often cultivate them with scrambled eggs in mind! They’re such a simple addition and impart a delightful, subtle allium essence to the eggs.
In general, I suggest adding seasonings to scrambled eggs after they’ve finished cooking. If you attempt to cook vegetables and then add eggs to the skillet, you’ll often miss the ideal temperature and face issues with the eggs adhering to the skillet. (The leftover oil and bits of veggies stuck to the pan can also alter the eggs’ color.)
Move the scrambled eggs to a plate to avert overcooking, then fold in components like sautéed or roasted vegetables and grated cheese. I love to sprinkle in a small handful of crushed tortilla chips, similar to those you’ll find in my migas. You might also enjoy a drizzle of sauce, such as salsa, hot sauce, or a dollop of sour cream.
The finest cheese for scrambled eggs:
You can’t go wrong, honestly. Grated cheddar cheese, Parmesan or Monterey Jack provide robust, cheesy flavors. I love adding crumbled goat cheese or feta to warm scrambled eggs, which soften somewhat and render the eggs exceedingly creamy.
Recommended Equipment
All-Clad D3 12-inch stainless steel frying pan or Lodge 12-inch cast iron skillet: You require a spacious skillet for cooking eggs. The All-Clad skillet is a luxury, but I’ve purchased similar, more affordable skillets in the past, and they twisted over high heat. Both of these skillets will endure your lifetime with proper maintenance.
OXO 9-inch whisk: I prefer cracking eggs into a glass measuring cup and whisking them with this small whisk, which doesn’t flop over the edge.
OXO silicone spatula: I particularly like the large red spatula because the angled edge helps lift the eggs.
Bamboo pot scrapers: Utilize your silicone spatula or a bamboo scraper to detach any remaining pieces of egg from the skillet while it’s still warm.
A note on nonstick skillets: I don’t advise using a nonstick skillet for this recipe because heating an empty nonstick skillet to this extent can damage the surface and release hazardous fumes if it’s made with Teflon. If you can achieve perfectly scrambled eggs without one, why use a pan that disintegrates and needs replacement every year?
More Recipes Highlighting Scrambled Eggs
Please let me know how your eggs turn out in the comments! I hope this technique works perfectly for you.
Print
Scrambled Eggs
This dish creates wonderfully fluffy, tender, and flavorful scrambled eggs. The recipe serves 2 and can be doubled in a larger skillet, although the cooking time for the eggs will increase.
- Set a silicone or rubber spatula and a large plate beside the stove for later use. In a 2-cup liquid measuring pitcher or a medium bowl, mix the eggs, half-and-half, and salt together. Preferably use a small whisk or a fork to blend the eggs until they appear uniformly yellow.
- Heat a large stainless steel or cast iron frying pan over medium heat (avoid using a non-stick skillet for this technique—it’s unsafe to preheat a nonstick skillet to this temperature). Allow the pan to preheat until it is so hot that when a few droplets of water are flicked at an angle onto the pan, they bounce or jump across the surface and then evaporate almost instantly (around 2 minutes). If they splatter and bubble upon contact, it’s not hot enough. As soon as you see a drop jump, proceed to the next step quickly.
- Incorporate the butter and chives, if using. Allow the butter to melt and swirl it around in the pan a couple of times. Once the butter has bubbled up and mostly settled, pour in the eggs. (If the butter has browned excessively during this process, your pan is too hot—restart.)
- Allow the eggs to sit until a white edge appears around the pan, approximately 10 to 15 seconds. Stir the eggs thoroughly with the spatula, ensuring to stir from the bottom of the pan.
- Let the eggs rest again for another 10 to 15 seconds, then stir once more, tilting the pan to help the runny eggs reach the skillet. Repeat this, stirring more frequently as the eggs heat up, until the eggs are still glossy but mostly set, taking about 1 ½ to 2 minutes total.
- Swiftly transfer the eggs to the plate. Garnish with grated cheese and additional chives, if desired. Serve while warm. For simple cleaning, use the spatula or a bamboo scraper to remove any egg remnants from the pan while it’s still warm.
Notes
Make it dairy-free: Substitute with plain, unsweetened non-dairy milk such as almond milk or cashew milk. Replace the butter with avocado oil or olive oil.
Nutrition
The data presented is an estimation provided by an online nutrition calculator. It is not intended as a substitute for a professional nutritionist’s counsel. See our full nutrition disclaimer here.
Post Comment